how to replace pump impellers
Ensuring the correct selection of a pump impeller is essential for the efficient operation and longevity of the pump system. Start by consulting the pump’s specifications, typically available on the manufacturer’s nameplate or in the user manual. The following factors should be considered when identifying the appropriate impeller for replacement:
- Model and Make: Verify the pump model number to ensure compatibility with the impeller.
- Impeller Size: Measure the diameter and width of the existing impeller to match the replacement accurately.
- Material: Select an impeller material that suits the fluid being pumped and the operating environment, such as stainless steel, bronze, or plastic.
- Type of Impeller: Determine whether a radial, axial, or mixed-flow impeller is required based on the pump’s application.
- Mounting Style: Ensure the impeller’s mounting method aligns with the pump’s shaft and housing design.
| Factor | Description |
|---|---|
| Model and Make | Confirm the pump’s model to find the exact impeller specifications. |
| Impeller Size | Accurate measurements prevent installation issues and ensure proper flow. |
| Material | Choose based on the chemical compatibility and durability requirements. |
| Type of Impeller | Match the impeller type to the desired flow and pressure characteristics. |
| Mounting Style | Ensure compatibility with the pump’s shaft and housing for secure installation. |
Additionally, reviewing the pump’s maintenance history can provide insights into any recurring issues that might influence the impeller selection. If available, using the original part number for the impeller replacement ensures the highest level of compatibility and performance.
gathering necessary tools and materials
Before commencing the replacement of pump impellers, it is crucial to assemble all the necessary tools and materials to ensure a smooth and efficient process. Having the right equipment on hand minimizes downtime and reduces the risk of errors during maintenance. Below is a comprehensive list of items typically required for this task:
- Wrenches and Socket Set: For loosening and tightening bolts and nuts securing the pump housing and impeller assembly.
- Screwdrivers: Both flathead and Phillips types may be needed to remove screws holding components in place.
- Nut Drivers: Useful for accessing and turning fasteners in confined spaces.
- Pliers: Grip and manipulate parts that are difficult to reach or hold.
- Hammer: For gently tapping parts loose without causing damage.
- Seal Kit: Includes gaskets and O-rings necessary for reinstalling the pump housing to prevent leaks.
- Replacement Impeller: Ensure you have the correct impeller model compatible with your pump system.
- Cleaning Supplies: Such as brushes and solvents to clean the pump components before installation.
- Measuring Tools: Calipers or micrometers to verify dimensions of the new impeller against the old one.
- Lubricants: To ensure smooth operation of moving parts after assembly.
- Safety Gear: Including gloves and safety glasses to protect against injuries during the replacement process.
Additionally, having a clear workspace and adequate lighting will facilitate the maintenance procedure. Organizing tools in a tool belt or nearby workspace can enhance efficiency by keeping essential items within easy reach.
| Tool/Material | Purpose |
|---|---|
| Wrenches and Socket Set | Loosening and tightening bolts and nuts securing pump components. |
| Screwdrivers | Removing screws that hold parts in place. |
| Seal Kit | Replacing gaskets and O-rings to ensure a leak-free assembly. |
| Replacement Impeller | Swapping out the old impeller with a new, compatible unit. |
| Cleaning Supplies | Preparing pump components by removing debris and buildup. |
Having a well-organized set of tools and materials not only streamlines the replacement process but also contributes to the overall effectiveness and reliability of the pump system post-maintenance. Proper preparation ensures that the installation of the new pump impellers is executed correctly, minimizing potential issues and extending the lifespan of the pump.
removing the existing impeller
Begin by ensuring the pump is completely shut down and disconnected from any power source to guarantee safety during the removal process. Next, isolate the pump from the system by closing any valves and relieving any system pressure. Follow these steps to effectively remove the existing impeller:
- Drain the Pump: Open the drain valve to remove any fluid remaining in the pump. This step prevents spills and makes the disassembly process cleaner.
- Disconnect the Pump: Carefully disconnect the pump from the piping system. Use appropriate tools to loosen and remove bolts or clamps securing the pump to the system.
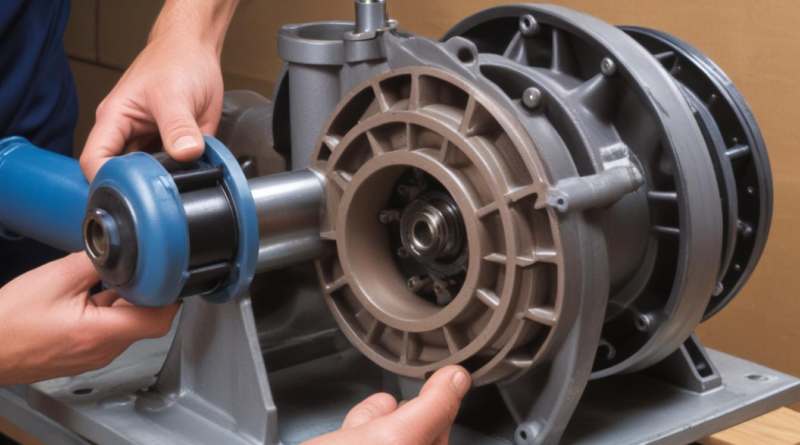
- Access the Impeller: Remove the pump housing by unscrewing the bolts that hold it in place. Depending on the pump design, you may need to remove additional components such as the motor or coupling to gain full access to the impeller assembly.
- Remove the Shaft Seal: Carefully extract the shaft seal to prevent damage to the pump shaft. Inspect the seal area for any signs of wear or debris and clean thoroughly if necessary.
- Extract the Impeller: Once the housing is removed, locate the impeller. Depending on the pump model, the impeller may be held in place by set screws, retaining rings, or other fastening mechanisms. Use the appropriate tool to release and remove these fasteners. Gently pull the impeller off the shaft, taking care not to damage the shaft or surrounding components.
- Inspect the Components: After removing the impeller, inspect the shaft, bearings, and housing for any signs of wear or damage. Address any issues found to ensure the pump operates efficiently after the replacement.
- Clean the Assembly: Use brushes and solvents to thoroughly clean the pump housing and shaft. Removing any debris or buildup ensures a smooth installation of the new impeller and prolongs the pump’s lifespan.
| Step | Description |
|---|---|
| 1. Shut Down and Isolate | Ensure the pump is off and isolate it from the system by closing valves and relieving pressure. |
| 2. Drain the Pump | Open the drain valve to remove any remaining fluid from the pump. |
| 3. Disconnect the Pump | Loosen and remove bolts or clamps to disconnect the pump from the piping system. |
| 4. Remove Housing | Unscrew the pump housing to access the impeller and internal components. |
| 5. Extract Impeller | Release and remove the impeller from the shaft using the appropriate tools. |
| 6. Inspect Components | Check the shaft, bearings, and housing for wear or damage. |
| 7. Clean Assembly | Thoroughly clean all pump components to prepare for the installation of the new impeller. |
During the removal process, it is essential to handle all components with care to avoid unnecessary damage. Utilize proper safety gear, including gloves and safety glasses, to protect against injuries. Keeping track of all fasteners and small parts by organizing them in labeled containers can prevent loss and facilitate a smoother reassembly. Additionally, documenting each step with notes or photographs can aid in ensuring that the pump is reassembled correctly during the installation of the new impeller.
installing the new impeller
 Once the existing impeller has been removed and the assembly area is prepared, proceed with the installation of the new impeller. Follow these detailed steps to ensure a successful replacement:
- Inspect the New Impeller: Before installation, verify that the new impeller matches the specifications of the original. Check for any defects or damage that might have occurred during shipping or handling.
- Apply Lubricant: Lightly lubricate the pump shaft and the hub of the new impeller using an appropriate lubricant. This facilitates smoother installation and reduces the risk of damaging the components.
- Position the Impeller: Carefully align the new impeller with the pump shaft. Ensure that it sits flush and is correctly oriented according to the pump’s design specifications.
- Secure the Impeller: Reattach any set screws, retaining rings, or fastening mechanisms that hold the impeller in place. Use the appropriate tools to tighten these fasteners securely, but avoid over-tightening, which could cause damage.
- Reinstall the Shaft Seal: Place the shaft seal back onto the pump shaft, ensuring it is seated correctly to prevent leaks. If a new seal is part of the replacement kit, install it according to the manufacturer’s instructions.
- Reassemble the Pump Housing: Carefully place the pump housing back onto the assembly. Align all mounting points and secure the housing with bolts or clamps. Tighten the fasteners in a crisscross pattern to ensure even pressure and proper sealing.
- Reconnect the Pump: Attach the pump back to the piping system by reconnecting any bolts or clamps that were removed during the disassembly. Ensure all connections are tight and secure.
- Replace Gaskets and O-Rings: Install new gaskets and O-rings from the seal kit to ensure a leak-free connection. Make sure they are properly seated in their grooves.
| Step | Description |
|---|---|
| 1. Inspect Impeller | Verify the new impeller matches specifications and is free from defects. |
| 2. Apply Lubricant | Lubricate the pump shaft and impeller hub to facilitate installation. |
| 3. Position Impeller | Align and place the impeller correctly on the pump shaft. |
| 4. Secure Impeller | Tighten set screws or retaining rings to hold the impeller in place. |
| 5. Reinstall Shaft Seal | Ensure the shaft seal is properly seated to prevent leaks. |
| 6. Reassemble Housing | Attach the pump housing and secure it with bolts or clamps. |
| 7. Reconnect Pump | Reconnect the pump to the piping system securely. |
| 8. Replace Gaskets | Install new gaskets and O-rings to ensure a leak-free connection. |
- Alignment: Proper alignment of the impeller on the shaft is critical to prevent excessive wear and ensure efficient pump operation.
- Tightening Fasteners: Use a torque wrench to achieve the manufacturer’s recommended torque specifications when securing bolts and fasteners.
- Seal Installation: Carefully follow the manufacturer’s instructions for installing the shaft seal to avoid misalignment and potential leaks.
- Cleanliness: Maintain a clean working environment during installation to prevent contaminants from entering the pump system.
Proper installation of the new pump impeller is crucial for maintaining the pump’s performance and extending its operational lifespan. By adhering to these detailed steps and utilizing the appropriate tools and materials, the replacement process can be carried out efficiently and effectively, ensuring the pump operates at optimal levels post-maintenance.
testing and verifying the repair
After completing the installation of the new impeller, it is essential to conduct thorough testing to ensure the repair was successful and that the pump operates efficiently. The following steps outline the procedure for testing and verifying the repair:
- Reconnect Power Supply: Ensure that all electrical connections are secure before restoring power to the pump. Verify that there are no exposed wires or loose connections that could pose safety hazards.
- Open System Valves: Gradually open the inlet and outlet valves to allow fluid flow through the pump system. This helps in preventing water hammer and reducing the risk of damage during startup.
- Prime the Pump: If applicable, prime the pump to remove any air trapped within the system. Proper priming ensures that the pump operates smoothly and prevents cavitation.
- Start the Pump: Slowly start the pump to monitor its initial performance. Observe the startup process for any irregularities such as unusual noises, vibrations, or resistance.
- Check for Leaks: Inspect all connections, seals, and the impeller area for any signs of leaking fluid. Address any leaks immediately by tightening connections or replacing faulty seals.
- Monitor Performance: Measure key performance indicators to ensure the pump operates within the desired parameters. Important metrics include:
| Performance Indicator | Expected Range |
|---|---|
| Flow Rate | As specified by pump manufacturer |
| Pressure | Within operational limits |
| Power Consumption | Consistent with pre-replacement values |
| Vibration Levels | Minimal and within safe thresholds |
| Sound Levels | Normal operating noise |
- Flow Rate: Use a flow meter to verify that the pump is delivering the expected volume of fluid. Deviations may indicate issues with impeller alignment or installation.
- Pressure: Measure the system pressure to ensure it aligns with the pump’s designed operating range. Inadequate pressure can lead to reduced performance, while excessive pressure may cause system strain.
- Power Consumption: Compare the current power usage with previous measurements. Significant increases could signal inefficiencies or potential problems with the new impeller.
- Vibration Levels: Utilize vibration sensors to detect any abnormal vibrations that could suggest misalignment, imbalance, or installation errors.
- Sound Levels: Listen for any unusual noises such as grinding, humming, or knocking, which may indicate mechanical issues with the impeller or other pump components.
Additionally, consider the following best practices during the testing phase:
- Gradual Load Increase: If the pump operates under variable loads, gradually increase the demand to observe how the system responds and ensure stability.
- Temperature Monitoring: Check the temperature of the pump and surrounding components to ensure there is no overheating, which could be a sign of excessive friction or electrical issues.
- Documentation: Record all observations, measurements, and any deviations from expected performance. This documentation is valuable for future maintenance and troubleshooting.
| Testing Activity | Purpose |
|---|---|
| Reconnect Power | Ensure safe and proper electrical setup before operation. |
| Open Valves | Allow fluid flow and prevent system damage during startup. |
| Prime the Pump | Eliminate air pockets to ensure smooth pump operation. |
| Start the Pump | Monitor initial performance and identify any immediate issues. |
| Check for Leaks | Verify the integrity of seals and connections post-replacement. |
| Monitor Performance | Ensure the pump operates within specified parameters and identify potential inefficiencies. |
By meticulously following these testing procedures, you can confirm that the pump impellers replacement was successful and that the pump system is functioning optimally. Addressing any issues identified during testing promptly will help maintain the reliability and efficiency of the pump, ensuring sustained performance and minimizing downtime in future operations.


