Replacing parts in progressive cavity pumps: a how-to guide
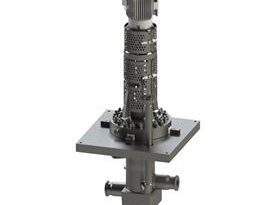
Progressive cavity pumps are a type of positive displacement pump widely utilized in various industries for their ability to handle viscous fluids and slurries effectively. These pumps operate on the principle of progressing cavities, where a rotating eccentric screw moves the fluid through a stator. This unique design minimizes turbulence and shear, making it suitable for pumping delicate and shear-sensitive materials.
One of the key advantages of progressive cavity pumps is their efficiency in handling a wide range of viscosities, which makes them ideal for applications in food processing, wastewater treatment, and chemical dosing. The construction of these pumps typically involves a helical rotor and a stator, where the rotor creates a series of expanding and contracting cavities as it rotates, allowing for a consistent flow rate.
In terms of maintenance, understanding the inner workings of progressive cavity pumps is essential for effectively replacing parts when they wear out. Regular inspection of components like the rotor, stator, and joints can help identify issues before they lead to pump failure, ensuring optimal performance and preventing costly downtime. This guide will help you gain a comprehensive understanding of the parts involved, thereby simplifying the replacement process and enhancing the lifespan of your pump.
Key components of progressive cavity pumps include:
- Stator: Provides the stationary element for the rotor to move against.
- Rotor: The helical screw that moves fluid through the stator.
- Drive Shaft: Transmits power from the motor to the rotor.
- bearings: Support the rotor and minimize wear.
Proper understanding of these components and their functions is crucial for effective troubleshooting and maintenance. By keeping abreast of common issues associated with progressive cavity pumps and their parts, users can proactively manage their pump systems, ensuring reliability and efficiency in fluid handling operations.
Identifying worn parts
Identifying worn parts in progressive cavity pumps is crucial to maintaining optimal performance and preventing operational failures. Regular inspections can significantly extend the life of these pumps and enhance overall efficiency. There are several telltale signs that indicate parts may need replacement, particularly in the rotor and stator assembly, which are the components most affected by wear.
Common indicators of wear include:
- Reduced Flow Rate: A noticeable decrease in flow can indicate that the rotor or stator has become worn and is no longer creating an effective seal.
- Unusual Noises: Sounds such as grinding or rattling often suggest that components are misaligned or damaged due to wear.
- Increased Power Consumption: An increase in the energy required to operate the pump can suggest inefficiencies caused by worn components.
- Leakage: Fluid leaks around the shaft seals typically point to a failing stator, indicating that a replacement is necessary.
To properly assess the condition of parts, it is advisable to conduct both visual and operational checks. During these inspections, consider the following:
- Check the rotor for signs of wear, such as pitting or scoring.
- Inspect the stator for cracks or deformation that could affect its shape and, thus, sealing capability.
- Examine the bearings for signs of damage and replace them if they exhibit wear or excessive play.
- Look for any physical damage to the drive shaft that might compromise its alignment.
Utilizing the right methods for identifying worn parts can prevent larger issues down the line. This detective work can lead to a insightful understanding of when replacing parts becomes necessary. Scheduling regular inspections and maintenance checks allows pump operators to preemptively replace worn parts and enhance the longevity and performance of their progressive cavity pumps.
Tools and materials needed
When preparing to address the needs of progressive cavity pumps, having the right tools and materials at hand is essential for an efficient replacement process. Proper equipment not only ensures a smooth operation but also minimizes the risk of damaging sensitive components during work. Below is a detailed list of what you will need:
- Wrenches: A set of adjustable wrenches and socket wrenches are crucial for removing bolts and nuts securely without stripping them.
- Screwdrivers: A variety of flat-head and Phillips screwdrivers will assist in handling smaller screws commonly found on the pump.
- Torque Wrench: To ensure that all components are fastened to the manufacturer’s specifications without over-tightening.
- Pump Alignment Tool: This is essential for aligning the rotor and stator during reassembly to prevent premature wear.
- Sealant and Adhesives: High-quality pump sealants are necessary for creating effective seals on joints and preventing leaks.
- Replacement Parts: Ensure you have the appropriate sized rotor and stator, as well as seals and bearings that meet the specifications for your specific pump model.
- Cleaning Supplies: Solvents, brushes, and rags will be required for cleaning old sealants and debris from the components.
- Safety Gear: Always wear gloves, goggles, and protective clothing to enhance safety during the maintenance process.
In addition to tools and materials, a suitable work environment is critical. Ensure that the workspace is clean, well-lit, and spacious enough to accommodate all necessary equipment. Moreover, having access to manufacturer guidelines or a guide specific to your model of progressive cavity pumps can enhance your understanding of the particularities associated with part replacement.
By gathering these tools and materials beforehand, you can streamline the process of replacing parts, ensuring that the pump operates at optimal performance levels without unnecessary delays.
Step-by-step replacement process
To successfully replace parts in progressive cavity pumps, a systematic approach is essential. Follow these detailed steps to ensure the process is carried out effectively, minimizing downtime and maximizing pump performance.
- Preparation: Begin by ensuring the pump is isolated from power and all fluids. Disconnect power source and drain the fluid from the pump to prevent spills. Use appropriate personal protective equipment (PPE) before proceeding.
- Disassemble the Pump: Carefully remove the bolts securing the pump housing using a wrench. Take care not to damage the housing or any components during this process.
- Remove the Rotor: Once the housing is off, gently pull out the rotor from the stator. Inspect the rotor for any signs of wear, such as scoring or deformation.
- Inspect the Stator: After the rotor is removed, check the stator for cracks or other deformities that may affect its performance. If worn or damaged, it should be replaced along with the rotor.
- Replace Other Components: Examine bearings and seals for wear. If necessary, replace these components to ensure the longevity and efficiency of the pump.
- Clean Surfaces: Before reassembly, thoroughly clean the surfaces of the rotor, stator, and housing to remove any old sealant or debris that could hinder the performance of the new parts.
- Install New Parts: Carefully insert the new rotor and stator into the housing. Ensure they are aligned correctly to avoid misalignment-related issues.
- Reassemble the Pump: Once new parts are installed, reinstall the pump housing by securing it with the appropriate hardware. Be sure to follow the manufacturer’s torque specifications with a torque wrench to prevent over-tightening.
- Test the Pump: Once fully reassembled, reconnect the pump to its power source and slowly restart it. Monitor for any leaks or unusual noises, and check the flow rate to ensure optimal performance.
- Document the Process: Keep a maintenance log noting the parts replaced and any observations during the inspection. This documentation can aid in future maintenance and troubleshooting.
Following this step-by-step guide for replacing parts in progressive cavity pumps not only ensures a smoother process but also enhances the reliability and efficiency of your equipment. Adopting a meticulous approach to maintenance will yield dividends in performance and longevity for the pump. Always refer to the manufacturer’s specifications for detailed instructions and guidelines specific to your progressive cavity pump model.
Maintenance tips for longevity
Maintaining the longevity of progressive cavity pumps is essential to ensure consistent performance and prevent unexpected failures. Regular maintenance practices can significantly extend the lifespan of these pumps, thus optimizing their efficiency and reliability. Here, several key maintenance tips should be implemented as part of a proactive management approach.
1. Regular Inspection: Schedule routine inspections to evaluate the condition of critical components like the rotor, stator, bearings, and seals. Each inspection should look for signs of wear, corrosion, or damage that could affect pump performance. Early detection of potential issues enables timely replacement of parts, avoiding more extensive repairs and downtimes.
2. Proper Lubrication: Ensure that all moving parts, especially bearings, are adequately lubricated as per the manufacturer’s specifications. Using the correct type and amount of lubricant reduces friction and wear, enhancing the efficiency of the pump operation.
3. Monitor Operational Parameters: Keep an eye on key operational metrics such as flow rates, pressure levels, and energy consumption. Unusual changes in these parameters can be indicative of worn or damaged components. Employ monitoring equipment, if necessary, to track these metrics effectively.
4. Maintain Seals: A critical aspect of progressive cavity pump maintenance is ensuring that seals are intact and functioning correctly. Worn seals can lead to leaks and loss of efficiency. Regularly check for signs of wear and replace them whenever necessary to prevent fluid loss and contamination.
5. Follow Manufacturer Guidelines: Each pump model may require specific maintenance practices according to the manufacturer’s recommendations. Always refer to the operation and maintenance manual to understand the unique maintenance needs of your progressive cavity pumps.
6. Keep the Work Environment Clean: A clean and clutter-free workspace minimizes the risk of debris entering the pump system during maintenance tasks. This practice not only prolongs the pump’s life but also ensures safety during maintenance procedures.
7. Train Staff Properly: Ensure that all personnel involved in the operation and maintenance of progressive cavity pumps are adequately trained. Understanding the operational principles and maintenance requirements will lead to better handling and fewer mistakes during routine checks and part replacements.
8. Document Maintenance Activities: Keep thorough records of all maintenance performed, including inspections, parts replaced, and any operational changes observed. This documentation aids in tracking overall pump performance and helps diagnose recurring issues that may arise.
By implementing these maintenance tips, operators can substantially enhance the performance and longevity of progressive cavity pumps. Proactive maintenance not only minimizes the likelihood of unplanned breakdowns but also contributes to the smooth and efficient operation of fluid handling processes.