how to install a pump in a sump pit
Before initiating the pump installation, it is essential to meticulously prepare the sump pit to ensure optimal performance and longevity of the system. Follow these guidelines to adequately prepare the pit:
- Clean the Sump Pit:
- Remove any debris, such as rocks, leaves, and dirt, to prevent blockages and ensure unobstructed water flow.
- Use a wet/dry vacuum for efficient removal of smaller particles and residual water.
- Inspect for Damage:
- Examine the interior of the sump pit for cracks or structural weaknesses.
- Repair any identified issues using appropriate sealants or materials to maintain the integrity of the pit.
- Verify Dimensions:
- Ensure the sump pit meets the size requirements specified by the pump manufacturer.
- Refer to the table below for typical sump pit dimensions based on pump capacity:
Pump Capacity (Gallons per Hour) Recommended Sump Pit Diameter Recommended Sump Pit Depth 1,000 – 1,500 18 inches 12 inches 1,500 – 2,500 24 inches 16 inches 2,500 – 3,500 30 inches 20 inches - Level the Pit Floor:
- Ensure the bottom of the sump pit is level to provide a stable base for the pump.
- Use a level tool to check and adjust as necessary.
- Install a Sump Basin:
- If not already present, place a sump basin or liner to protect the pump and facilitate efficient water intake.
- Ensure the basin fits securely within the sump pit and allows for proper water flow.
- Ensure Proper Ventilation:
- Check that the sump pit has adequate ventilation to prevent mold growth and maintain air quality.
- Install vents if necessary, following local building codes and manufacturer guidelines.
Adhering to these preparation steps will create an optimal environment for the pump, enhancing its efficiency and prolonging its operational lifespan.
selecting the right pump
Selecting the appropriate pump is critical to the success of your sump pit system. The right choice ensures efficient water removal, minimizes the risk of flooding, and prolongs the lifespan of the pump. Consider the following factors when choosing a pump:
- Types of Sump Pumps:
- Submersible Pumps: Designed to operate underwater, these pumps are typically quieter and more efficient. They are ideal for deeper sump pits and offer better protection against freezing temperatures.
- Pedestal Pumps: Positioned above the sump pit, these pumps are easier to service and repair. They are generally less expensive but can be noisier and less efficient compared to submersible models.
- Pump Capacity:
- Determine the appropriate gallons per hour (GPH) rating based on the volume of water your sump pit is expected to handle. Refer to the following table for guidance:
Water Volume (Gallons per Hour) Recommended Pump Capacity Up to 1,500 1/3 HP 1,500 – 3,000 1/2 HP 3,000 – 5,000 3/4 HP Above 5,000 1 HP or higher - Material and Durability:
- Choose a pump constructed from durable materials such as cast iron or high-strength plastic to withstand harsh conditions and reduce maintenance needs.
- Consider corrosion-resistant features, especially if the sump pit is exposed to harsh environmental factors.
- Features and Functionality:
- Float Switch: Ensures the pump activates only when water reaches a certain level, preventing dry running and potential damage.
- Check Valve: Prevents backflow of water into the sump pit, maintaining the efficiency of the system.
- Backup Power Options: Consider pumps with battery backups or plug-in capabilities to ensure functionality during power outages.
- Alarm Systems: Alerts you in case of pump failure or high water levels, providing an additional layer of protection.
- Energy Efficiency:
- Select a pump with energy-efficient motors to reduce operational costs and environmental impact.
- Look for Energy Star-rated models that meet specific energy efficiency criteria.
- Manufacturer’s Guidelines:
- Always refer to the pump manufacturer’s guidelines to ensure compatibility with your specific sump pit dimensions and requirements.
- Adhering to these guidelines during pump installation helps avoid common issues and guarantees optimal performance.
- Warranty and Support:
- Choose pumps that offer comprehensive warranties and access to customer support, ensuring assistance is available if issues arise.
- Extended warranties can provide added peace of mind and protect your investment over time.
By carefully evaluating these factors, you can select a pump that not only fits your sump pit but also meets your specific needs, providing reliable protection against basement flooding and water damage.
gathering necessary tools and materials
To ensure a smooth and efficient pump installation, it is crucial to gather all the necessary tools and materials beforehand. Having the right equipment on hand not only streamlines the installation process but also minimizes the risk of errors and delays. Below is a comprehensive list of items you will need:
- Tools:
- Adjustable Wrench: Essential for tightening and loosening various plumbing connections.
- Screwdrivers: Both flathead and Phillips for securing pump components and electrical connections.
- Pipe Cutter: Used to cut PVC or other types of piping to the required lengths.
- Drill and Bits: Necessary for making precise holes in the sump pit or surrounding areas for fittings and wiring.
- Level: Ensures that the pump is installed on a flat and stable surface, preventing vibrations and operational issues.
- Teflon Tape: Applied to threaded connections to prevent leaks.
- Measuring Tape: For accurate measurements of pipe lengths and sump pit dimensions.
- Pliers: Useful for gripping and manipulating pipes and fittings.
- Materials:
- Sump Pump: Select the appropriate pump based on the guidelines provided in the previous section.
- Check Valve: Prevents backflow of water into the sump pit, ensuring efficient operation of the pump.
- PVC Piping: Connects the pump to the discharge point outside your home. Ensure you have the correct diameter and length.
- Discharge Pipe Fittings: Includes elbows, tees, and adapters needed to route the discharge pipe effectively.
- Hose Clamps: Secure connections between hoses and fittings to prevent leaks.
- Sealants and Adhesives: Use waterproof sealant to ensure all connections are watertight.
- Electrical Wiring: Ensure you have appropriate wiring and a GFCI-protected outlet for the pump’s power supply.
- Extension Cords (if necessary): For temporary power supply during installation.
- Bucket or Container: To remove any residual water from the sump pit before installation.
- Protective Gear:
- Gloves: Protect your hands while handling tools and materials.
- Safety Glasses: Shield your eyes from debris and splashes.
- Work Boots: Provide foot protection in the sump pit area.
- Additional Components:
- Backup Battery System: For pumps that require uninterrupted operation during power outages.
- Alarm System: Optional but recommended for monitoring pump performance and alerting you to potential issues.
- Pipe Insulation: Prevents freezing of discharge pipes in colder climates.
- Brackets or Mounting Hardware: Secure the pump and associated components within the sump pit.
| Category | Item | Purpose |
|---|---|---|
| Tools | Adjustable Wrench | Tightening plumbing connections |
| Tools | Pipe Cutter | Cutting PVC pipes to length |
| Materials | Check Valve | Preventing backflow |
| Materials | PVC Piping | Connecting pump to discharge point |
| Additional | Backup Battery System | Ensuring pump operation during outages |
| Additional | Pipe Insulation | Preventing pipe freezing |
Adhering to these guidelines and ensuring you have all the necessary tools and materials will facilitate a successful pump installation. Proper preparation is key to maintaining the efficiency and reliability of your sump pit system.
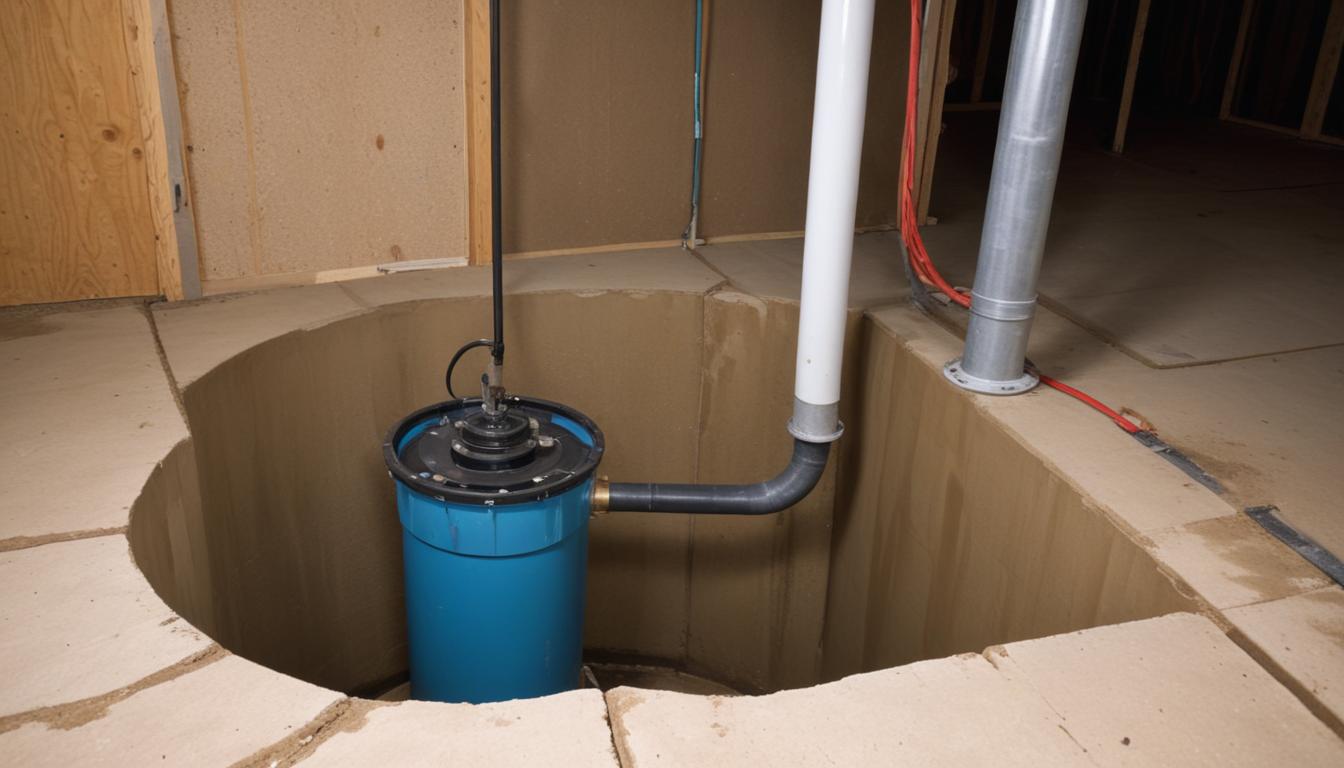
installing the pump correctly
 Begin by carefully positioning the pump within the sump pit to ensure optimal performance. Follow these detailed steps to install the pump correctly:
- Position the Pump:
- Place the pump in the center of the sump basin to allow for even water distribution and efficient operation.
- Ensure that the pump sits firmly on a level surface to prevent vibrations and reduce wear during operation.
- Connect the Discharge Pipe:
- Attach the discharge pipe to the pump’s outlet using a pipe wrench and apply Teflon tape to the threaded connections to prevent leaks.
- Ensure the pipe runs smoothly without sharp bends to maintain optimal water flow. Refer to the table below for recommended pipe diameters based on pump capacity:
Pump Capacity (Gallons per Hour) Recommended Discharge Pipe Diameter Up to 1,500 GPH 1½ inches 1,500 – 3,000 GPH 2 inches 3,000 – 5,000 GPH 2½ inches Above 5,000 GPH 3 inches - Install the Check Valve:
- Position the check valve on the discharge pipe, ensuring it is oriented correctly to allow water flow away from the sump pit.
- Secure the check valve using hose clamps to prevent backflow and maintain system efficiency.
- Make Electrical Connections:
- Connect the pump to a dedicated GFCI-protected outlet to ensure safety and compliance with electrical codes.
- If using a battery backup system, follow the manufacturer’s instructions to integrate it with the primary power source.
- Ensure all electrical connections are secure and protected from moisture to prevent short circuits or electrical failures.
- Secure the Pump:
- Use mounting brackets or straps to firmly secure the pump within the sump pit, minimizing movement and reducing noise during operation.
- Double-check that all connections are tight and that the pump is stable within the basin.
- Install the Float Switch:
- Attach the float switch to the pump according to the manufacturer’s guidelines, ensuring it moves freely without obstruction.
- Set the float switch to activate the pump at the appropriate water level to prevent overflow and ensure timely water removal.
- Route the Discharge Pipe Properly:
- Ensure the discharge pipe extends at least 10 feet away from the foundation of the house to prevent water from seeping back into the sump pit.
- Direct the discharge away from windows, doors, and other areas prone to water intrusion.
- Use pipe insulation in colder climates to prevent freezing and maintain consistent water flow.
- Finalize Connections and Sealant:
- Apply waterproof sealant to all pipe joints and connections to ensure a watertight installation.
- Inspect all connections for potential leaks and make necessary adjustments before proceeding.
- Secure the Sump Pit Cover:
- Once the pump and all connections are in place, securely fasten the sump pit cover to prevent debris from entering and to maintain system integrity.
- Ensure the cover does not interfere with the pump’s operation or the movement of the float switch.
Implementing these steps with precision and adhering to the provided guidelines will ensure a successful pump installation. Proper installation not only enhances the efficiency of the sump pit system but also extends the lifespan of the pump, providing reliable protection against basement flooding and water damage.
testing and maintenance tips
Testing and maintaining your sump pump is essential to ensure its reliability and extend its lifespan. Follow these comprehensive guidelines to effectively test and perform regular maintenance on your pump installation:
Initial Testing:
- Power On the Pump:
- Ensure the pump is securely plugged into a GFCI-protected outlet.
- Confirm that the float switch moves freely without any obstructions.
- Simulate Water Flow:
- Gradually add water to the sump pit until it reaches the activation level of the float switch.
- Observe the pump as it activates to ensure it starts promptly and effectively discharges water.
- Check for Leaks:
- Inspect all pipe connections and the pump housing for any signs of water leakage.
- Apply additional sealant to any areas where leaks are detected.
- Verify Discharge:
- Ensure that the discharge pipe directs water at least 10 feet away from the foundation.
- Confirm there are no blockages or restrictions in the discharge path that could impede water flow.
Regular Maintenance:
- Monthly Inspections:
- Remove any debris or sediment that has accumulated in the sump pit.
- Check the float switch and impeller for proper operation and cleanliness.
- Ensure the discharge pipe remains clear and free from obstructions.
- Seasonal Maintenance:
- In colder months, inspect and insulate discharge pipes to prevent freezing.
- Test the backup battery system to ensure it functions correctly during power outages.
- Annual Servicing:
- Schedule a professional inspection to evaluate the pump’s condition and performance.
- Replace any worn or damaged parts, such as seals or impellers, to maintain efficiency.
- Thoroughly clean the sump pit and pump housing to remove any buildup that could affect functionality.
- Cleaning Procedures:
- Regularly clean the intake screen to prevent debris from entering the pump.
- Wipe down the exterior of the pump with a mild detergent and water, avoiding harsh chemicals that could damage components.
- Monitor Pump Performance:
- Listen for any unusual noises that might indicate mechanical issues.
- Observe the pump’s cycling behavior to ensure it turns on and off smoothly without frequent short cycling.
- Check that the pump maintains consistent discharge capacity over time.
Troubleshooting Common Issues:
- Pump Not Activating:
- Verify that the pump is plugged in and the outlet is functioning correctly.
- Check the float switch for any obstructions and ensure it moves freely.
- Inspect the electrical connections and reset the GFCI outlet if necessary.
- Continuous Pump Operation:
- Ensure the float switch is not stuck in the “on” position.
- Check the discharge pipe for clogs that may cause water to back up into the sump pit.
- Inspect the check valve for proper function to prevent backflow.
- Reduced Pump Efficiency:
- Clean the intake screen and impeller to remove any debris buildup.
- Replace worn seals or gaskets that may be causing leaks.
- Ensure the discharge pipe is free from bends and obstructions that could impede water flow.
- Unusual Noises:
- Remove any debris lodged in the pump that could be causing noise.
- Tighten any loose components that may be vibrating during operation.
- Inspect the float switch and related mechanisms for signs of wear or damage.
Record Keeping:
- Maintenance Logs:
- Keep a detailed log of all maintenance activities, including dates, tasks performed, and any parts replaced.
- This documentation helps track the pump’s performance and identify recurring issues.
- Performance Monitoring:
- Record pump activation times and discharge volumes to assess efficiency.
- Use this data to anticipate maintenance needs and prevent unexpected failures.
Emergency Preparedness:
- Backup Power Systems:
- Ensure that battery backups are charged and functioning properly to maintain pump operation during power outages.
- Regularly test the backup system to confirm it activates when needed.
- Alarm Systems:
- Keep alarm systems functional to alert you of pump failures or high water levels.
- Test alarms periodically to ensure they are working correctly.
Adhering to these testing and maintenance tips will ensure your sump pump remains in optimal condition, providing reliable protection against basement flooding and safeguarding your investment in the pump installation. Regular maintenance not only enhances the efficiency of the sump pit system but also extends the operational lifespan of the pump, ensuring peace of mind during critical times.